|
Title: The Heat Tracking Activity
 Other
Curriculum Objectives that can be addressed by this lesson plan Other
Curriculum Objectives that can be addressed by this lesson plan
English Language Arts: 2.1, 2.3, 4.1;Mathematics:
(Gr 7) 1.1, 1.2, 4.2, 5.1, 5.2, 5.3, 6.4; Science: (Gr.7) 2.2, 2.3,
2.4, 2.5, 2.6, 2.7, 2.8, 2.9, 2.13, 3.3; Computer Skills: (Gr. 7)
2.3
Grade: 7
Competency 2.3: Use a prepared spreadsheet
to enter and edit data and explain the results of the changes.
Measure 2.3.1: Given a prepared spreadsheet,
enter the temperatures taken from various parts of the classroom
and discuss the resulting data.
Materials Needed: Transparency of Introduction to Spreadsheets #4 black line master;
six thermometers and tape; transparencies of the Thermometer Placement, Temperature Hypothesis Worksheet, and Analysis
Spreadsheet black line masters; six copies of the Temperature
Hypothesis Worksheet black line master; 8.5X11 signs; computer with
prepared spreadsheet file. (file=TEMPCOMP)
Time: Three class sessions.
Terms: Column, Row, Cell, Label, Value,
Formula, Edit, Enter
 Grade 7 Glossary Grade 7 Glossary
Activities
Pre-Activities:
- Review spreadsheet concepts of: row, column,
cell, values, labels, and formulas.
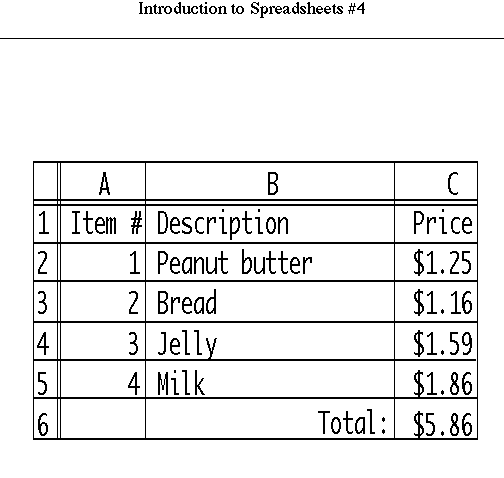
- Project the Introduction to Spreadsheets #4
transparency for the class to see and ask the class to answer
the following questions:
- Where is the word Bread? Cell B3
- Where is the price of milk? Cell C5
- What column holds the prices? Column C
- Where is the formula of this spreadsheet? Cell
C6
- What is the formula? =C2+C3+C4+C5 or =SUM(C2...C5)
- Is Jelly a label or a value? Label
Activity:
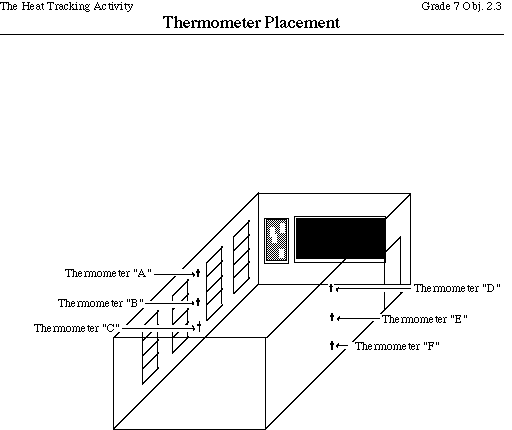
Tape six thermometers to the walls of your classroom
along with 8.5x11 signs (locations A, B, C, D, E, F) in the locations
described in the Thermometer Placement black line master.
Activity 1 Hypotheses
- Explain to the class that they are going to
be using a computer spreadsheet to test some hypotheses about
the behavior of heat in their classroom.
- Project the transparency of the Thermometer
Placement black line master. Describe the locations of each thermometer.
Explain that you want the students to make some hypotheses of
how the temperatures in the classroom will change from location
to location and from the beginning to the end of the school day.
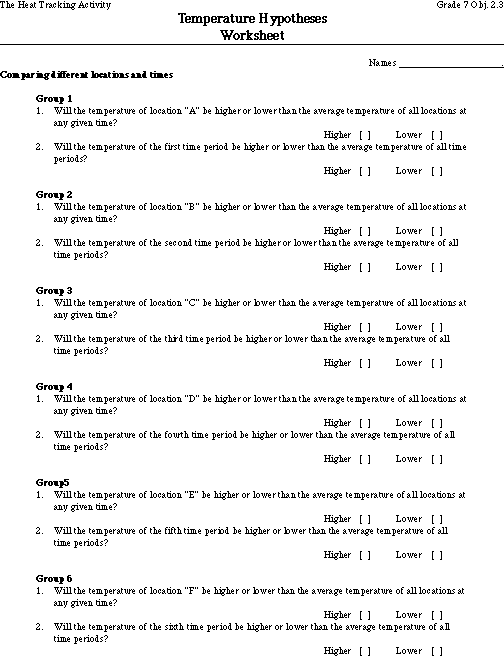
- Divide the class into groups of three or four
students and label them alphabetically from "A" to "F".
Hand out copies of the Temperature Hypotheses Worksheet black
line master to each group and project a transparency of this handout.
- Explain that each group is to read each of
the questions for their group and develop a hypothesis about heat
related to the question: if the temperature would be "higher"
or "lower."
- Explain that they must also be able to explain
their hypotheses. Give the groups about 15 minutes to answer their
questions and compose their justification.
- Ask a representative from each group to report
their answers/hypotheses and justification. Give the class an
opportunity to react to each group's hypotheses. Record the hypotheses
on the transparency using an erasable transparency marker.
Activity 2: Data Collection
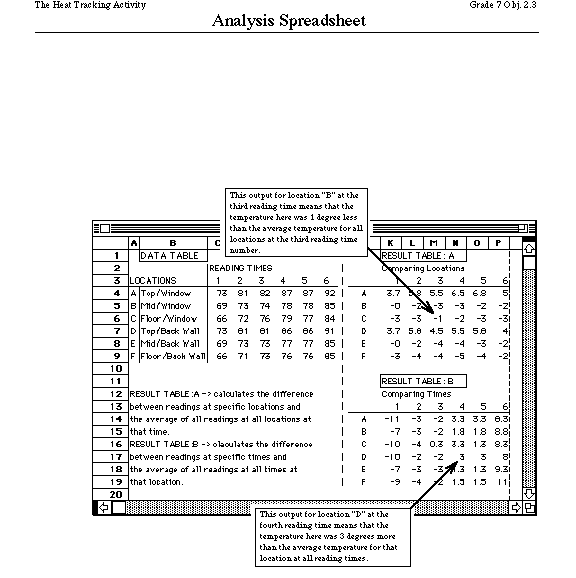
- Project a transparency of the Analysis Spreadsheet
black line master and use it to help describe each section of
the spreadsheet. Explain that they will enter the actual temperatures
into the spreadsheet tomorrow. Assign each group a time to read
one of the thermometers.
a.The Data Table is where the temperature data
was entered into the spreadsheet.
b.The Result Table: A calculates a comparison
between each location and the same location at other times. The
values in the table represent the number of degrees higher or
lower than the mean (average) of all times at the same location.
For instance, a value of -2 for location "B" during
period "2" means that location "B" was 2 degrees
below the mean temperature of all periods at location "B".
c.The Result Table: B calculates a comparison
between each reading and all other readings during the same time.
The values in the table represent the number of degrees higher
or lower than the mean (average) of all locations at that time.
For instance, a value of 1.8 for location "B" during
period "4" means that location "B" was a half
degree more than the mean of all locations during period "4".
Negative numbers indicate that the temperature was below the room
mean.
- Have a computer set up in the classroom running
the spreadsheet file TempComp. During the day have students check
the temperatures at their assigned site and enter the temperatures
into the TEMPCOMP spreadsheet.
Activity 3: Data Analysis
Print out the TempComp spreadsheet and make copies
for each group.
- Divide the class into
the groups that were designated during Activity 1. Project a transparency
of Analysis Spreadsheet black line master and review each section
of the spreadsheet.
- Ask each group to examine the spreadsheet printout
and determine if their hypotheses were supported by the data.
Discuss as a total group any major differences in the hypothesis
and the results that are discovered.
- Ask each group to design another experiment
assuming that they have all the money and materials needed to
further test their hypotheses. They should describe the data that
would be generated by the experiment and how a computer spreadsheet
would be used to manage the data. Have a representative of each
group report their conclusions and briefly describe their experiment.
Measure
Students will collect temperature readings every
hour during the day and enter them into a prepared spreadsheet that
calculates the average temperature. Students will discuss the resulting
data.
|