Microsoft Word 2007 - Forms
A form is a structured document with spaces reserved for entering information. It is very usefulif you have a form design complete or use an existing form as a guide. In this way you will be better able to structure the format of your form.
On the Developer tab, in the Controls group, click Design Mode, and then click where you want to insert a control.
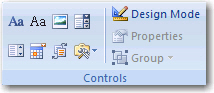
You can create fill-in boxes, check boxes, and drop-down lists.
Insert a text control (this allows you to set up the text box where you expect users to enter text)
- On the Developer tab, in the Controls group, click the Rich Text control
 or the Text control
  .
.
Insert a drop-down list ( this allows you to restrict the choices that are available to the user)
- On the Developer tab, in the Controls group, click the Drop-Down List control
 .
. - Select the content control, and then on the Developer tab, in the Controls group, click Properties.
- To create a list of choices, under Drop-Down List Properties, click Add.
- Type a choice in the Display Name box, such as Yes, No, or Maybe.
Repeat this step until all of the choices are in the drop-down list.
You can protect individual content controls in a template to help prevent someone from deleting or editing a particular content control or group of controls, or you can help protect all of the template content with a password.
Tip If you want, you can test the form prior to distributing it. Open the form, fill it out as the user would, and then save a copy in a location that you want.
Protect all of the contents of a form
- Open the form that you want to help protect.
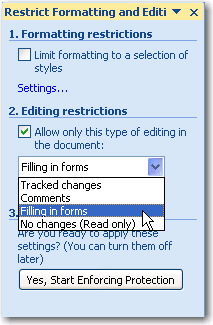
- On the Developer tab, in the Protect group, click Protect Document, and then click Restrict Formatting and Editing.

- In the Protect Document task pane, under Editing restrictions, select the Allow only this type of editing in the document check box.
- In the list of editing restrictions, select Filling in forms.
- Under Start enforcement, click Yes, Start Enforcing Protection.
- To assign a password to the document so that only reviewers who know the password can remove the protection, type a password in the Enter new password (optional) box, and then confirm the password.
Important If you choose not to use a password, anyone can change your editing restrictions.
All Rights Reserved.